Getting started
- Sale System - point of sale application
- POI Terminal - the DataMesh payments terminal (PINpad)
The steps outlined below will guide you through creating a dev account, scoping your Sale System requirements based on the DataMesh functionality, coding and testing your integration, getting accredited with DataMesh, and finally deploying your solution into production.
- Create a test account
- Determine your integration type
- Design your integration
- Code your POS integration
- POS accreditation
- Production deployment
Create a test account
All DataMesh integrations require a physical DataMesh terminal. Depending on the integration type DataMesh may also need to allocate Sale System credentials.
When requesting a development terminal and account, let us know:
- Which integration type(s) you plan on working with
- If you plan of supporting multiple Sale Systems connected to the same terminal, or multiple terminals connected to one Sale System.
You can request a terminal and a development account via integrations@datameshgroup.com
Determine your integration type
DataMesh provides a variety of options to help you design your integration depending on your Sale System type.
| Sale System Type | Fusion App | Fusion Satellite | Fusion Cloud |
|---|---|---|---|
| Windows-based POS where it's possible to install the DataMesh middleware on the same PC where the POS application is running on | ✔ | ||
| POS on Pinpad/POI Terminal | ✔ | ||
| Other POS type including Legacy POS/On-Premises POS/Traditional POS and POS on Mobile (iOS/Android) device | ✔ |
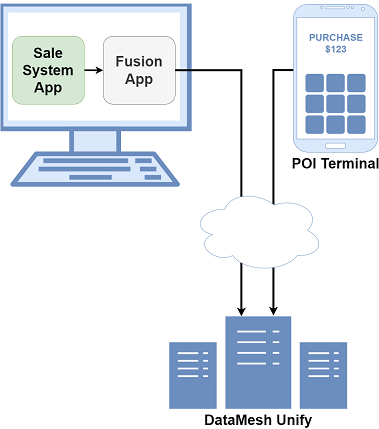
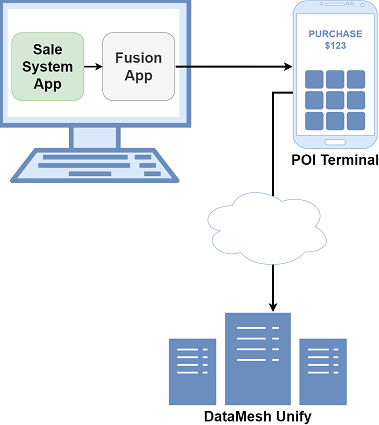
Fusion App
Fusion App is a DataMesh middleware that is installed in the PC as the Sale System.
Fusion App wraps the Fusion Cloud API and handles many of the interactions between the Sale System and the POI terminal (web socket, security, pairing, error handling, UI etc).
There are two ways on how the Fusion App communicates with the POI terminal:
- Cloud - Fusion App communicates with the POI terminal via a Websocket connected to the DataMesh Unify switch.
- USB Connection
- Base USB Connection - Fusion App communicates with the POI terminal through a USB cable connected to the POI terminal’s Base/Dock device. The POI terminal must be paired with its Base/Dock device.
- Terminal USB Connection - Fusion App communicates with the POI terminal through a USB cable connected directly to the POI terminal.
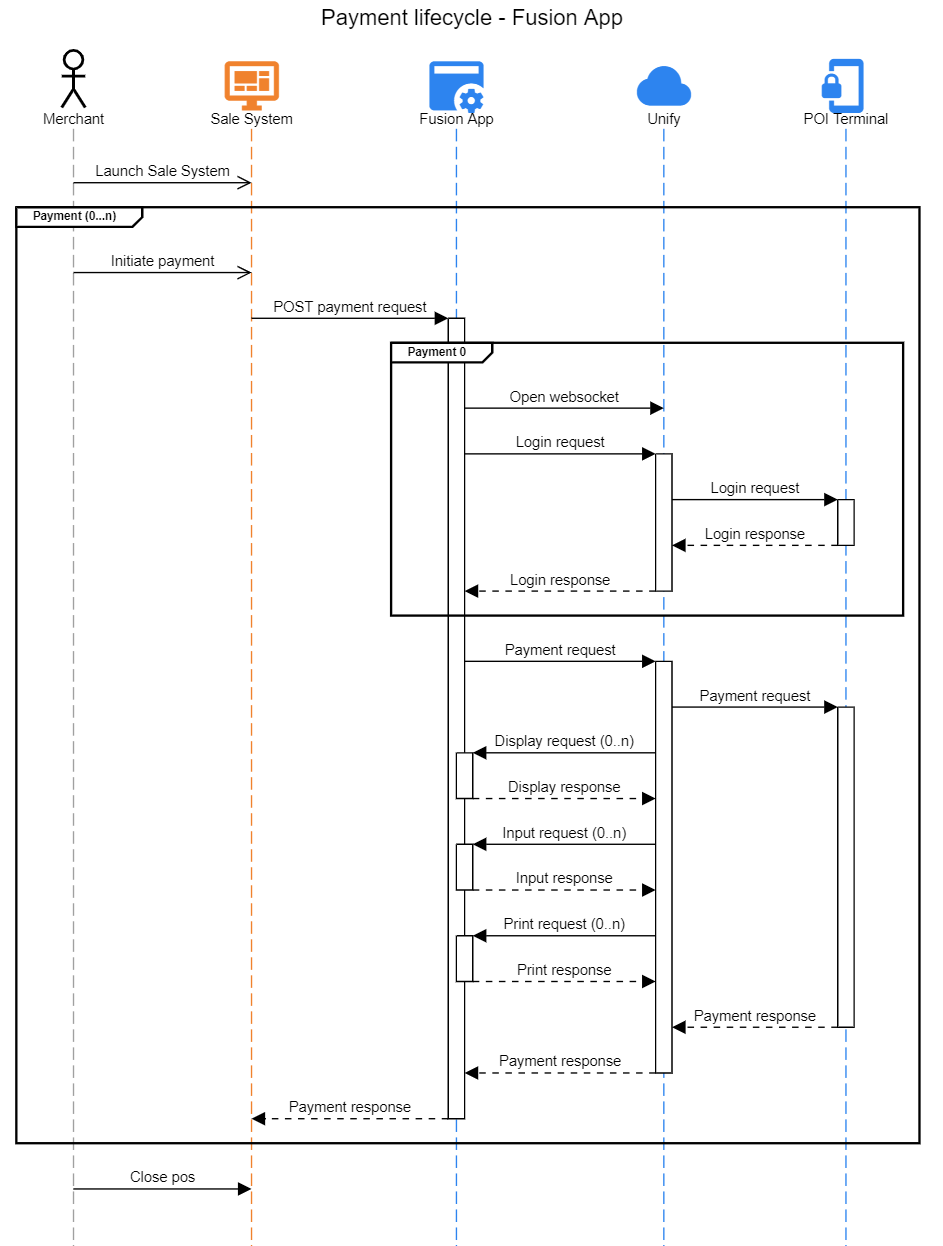
There are two methods for processing a payment using Fusion App:
- Events mode - the Sale System sends a HTTP POST to a local endpoint, and if valid receives 202 ACCEPTED. The Sale System polls Fusion App, processing events received until the payment response is returned.
- Blocking - the Sale System sends a HTTP POST to a local endpoint, and waits for a response. If successful (200 OK) the response will contain the payment response details.
In both methods, in case of an error (timeout, system crash etc), the Sale System sends a HTTP GET request to request the status of the payment.
Where possible, DataMesh recommends implementing events mode.
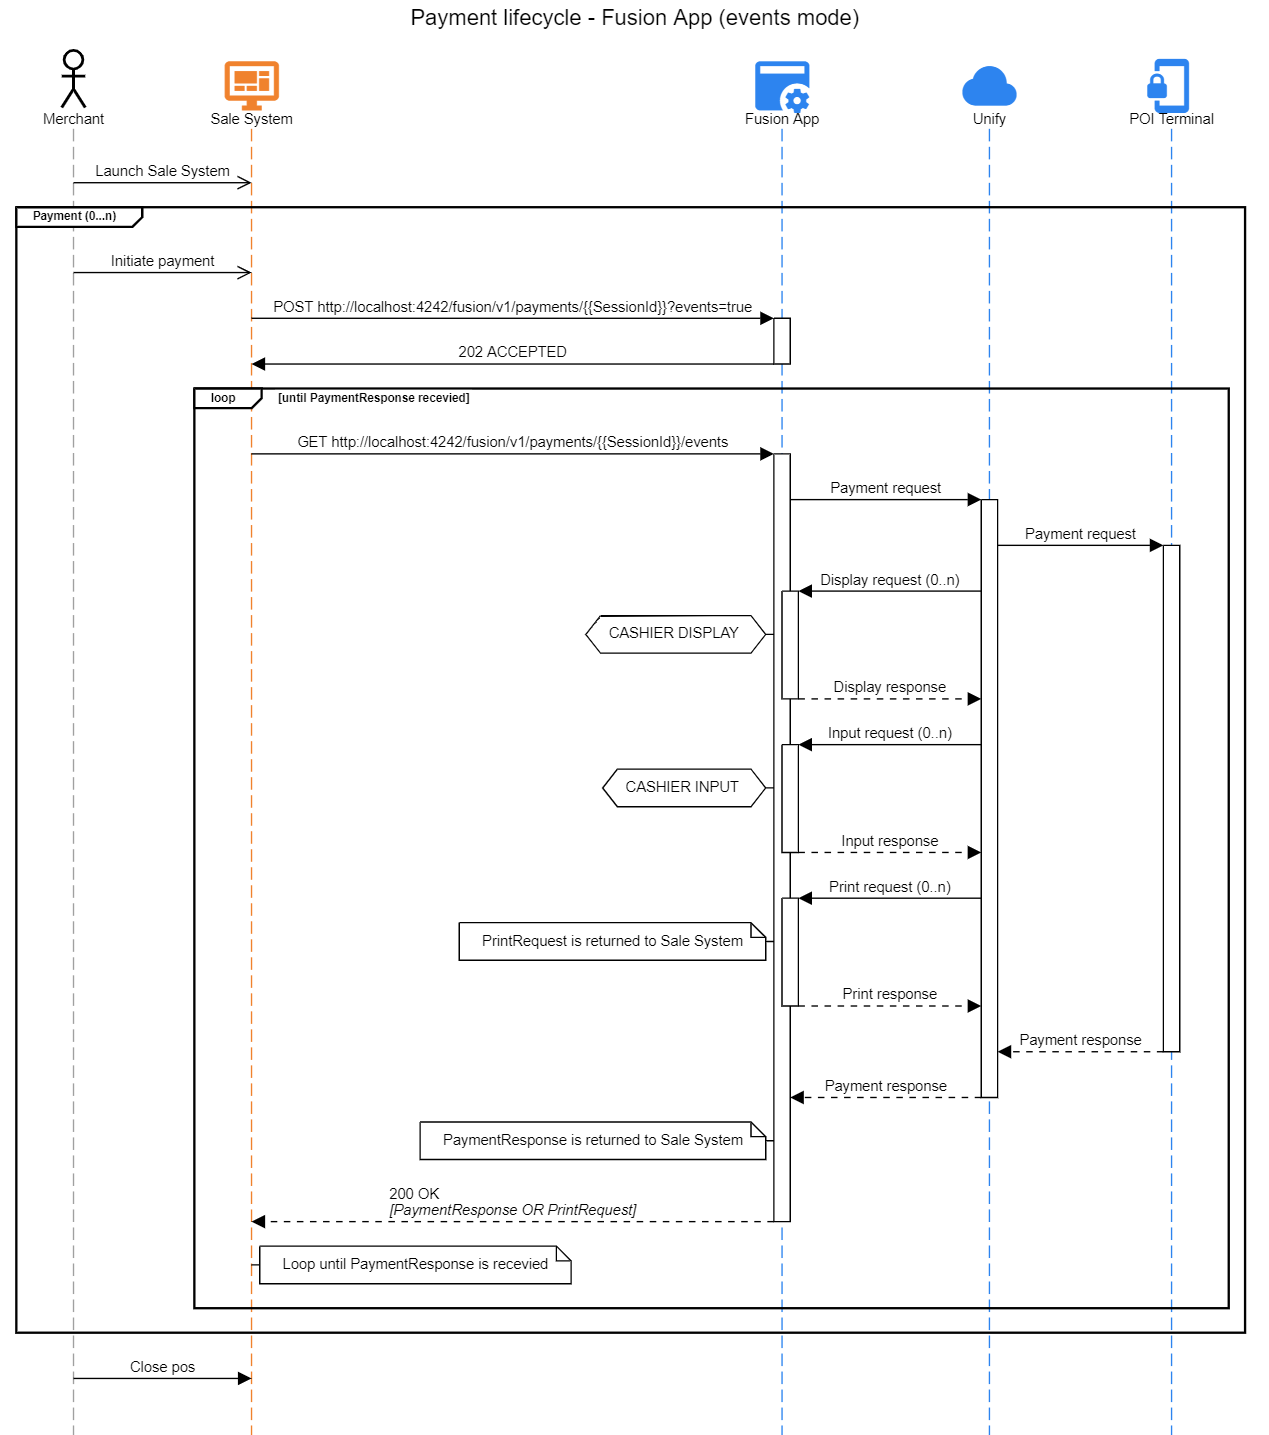
Fusion App payment lifecycle (events mode)
- Merchant launches the Sale System.
- Merchant initiates a payment.
- Sale system generates a unique
SessionIDas a UUIDv4 and constructs a payment request object. - Sale System POSTs the payment request for the
SessionIDto Fusion App's local HTTP end point for payments and waits for a response. - If the request is valid, Fusion App will respond with 202 ACCEPTED and start processing the payment.
- Sale System GETs and processes each event until a PaymentResponse is received
- Merchant closes the Sale System.
- If the Sale System doesn't receive a payment response (timeout, system crash etc) from Fusion App it needs to enter error handling by calling (GET /payments/{{SessionId}})
Fusion App payment lifecycle (blocking mode)
- Merchant launches the Sale System.
- Merchant initiates a payment.
- Sale system generates a unique
SessionIDas a UUIDv4 and constructs a payment request object. - Sale System POSTs the payment request for the
SessionIDto Fusion App's local HTTP end point for payments and waits for a response. - Fusion App does all the necessary payment processing.
- Sale System receives a payment response.
- Merchant closes the Sale System.
- If the Sale System doesn't receive a payment response (timeout, system crash etc) from Fusion App it needs to enter error handling by calling (GET /payments/{{SessionId}})
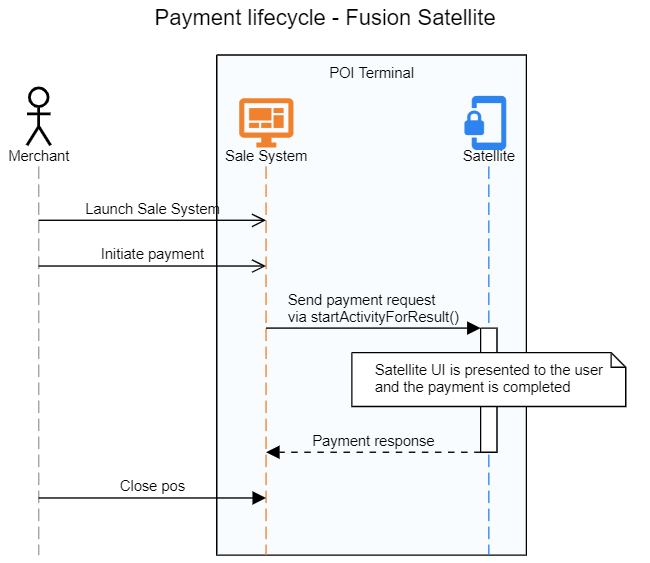
Fusion Satellite
The Fusion Satellite API allows a Sale System running on the POI terminal to communicate with the DataMesh Satellite payment application on the same POI terminal using inter-app communication with Android intents.
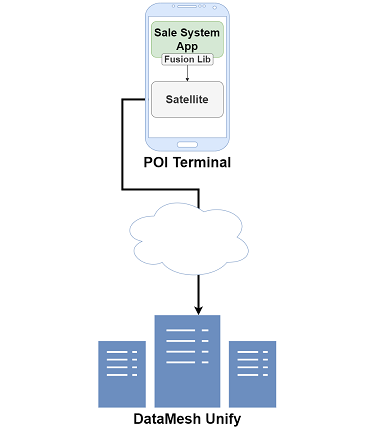
Fusion Satellite payment lifecycle
- Merchant launches the Sale System on the POI Terminal.
- Merchant initiates a payment.
- Sale system constructs a payment request object.
- Sale System calls Satellite via startActivityForResult() and waits for a response.
- Satellite does all the necessary payment processing.
- Sale System receives a payment response.
- Merchant closes the Sale System.
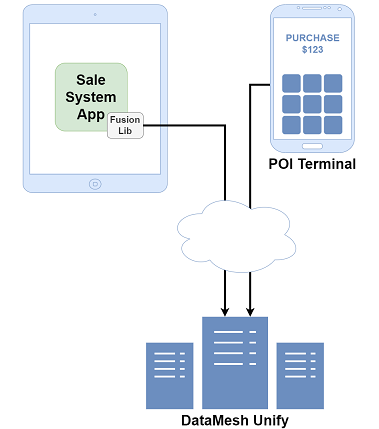
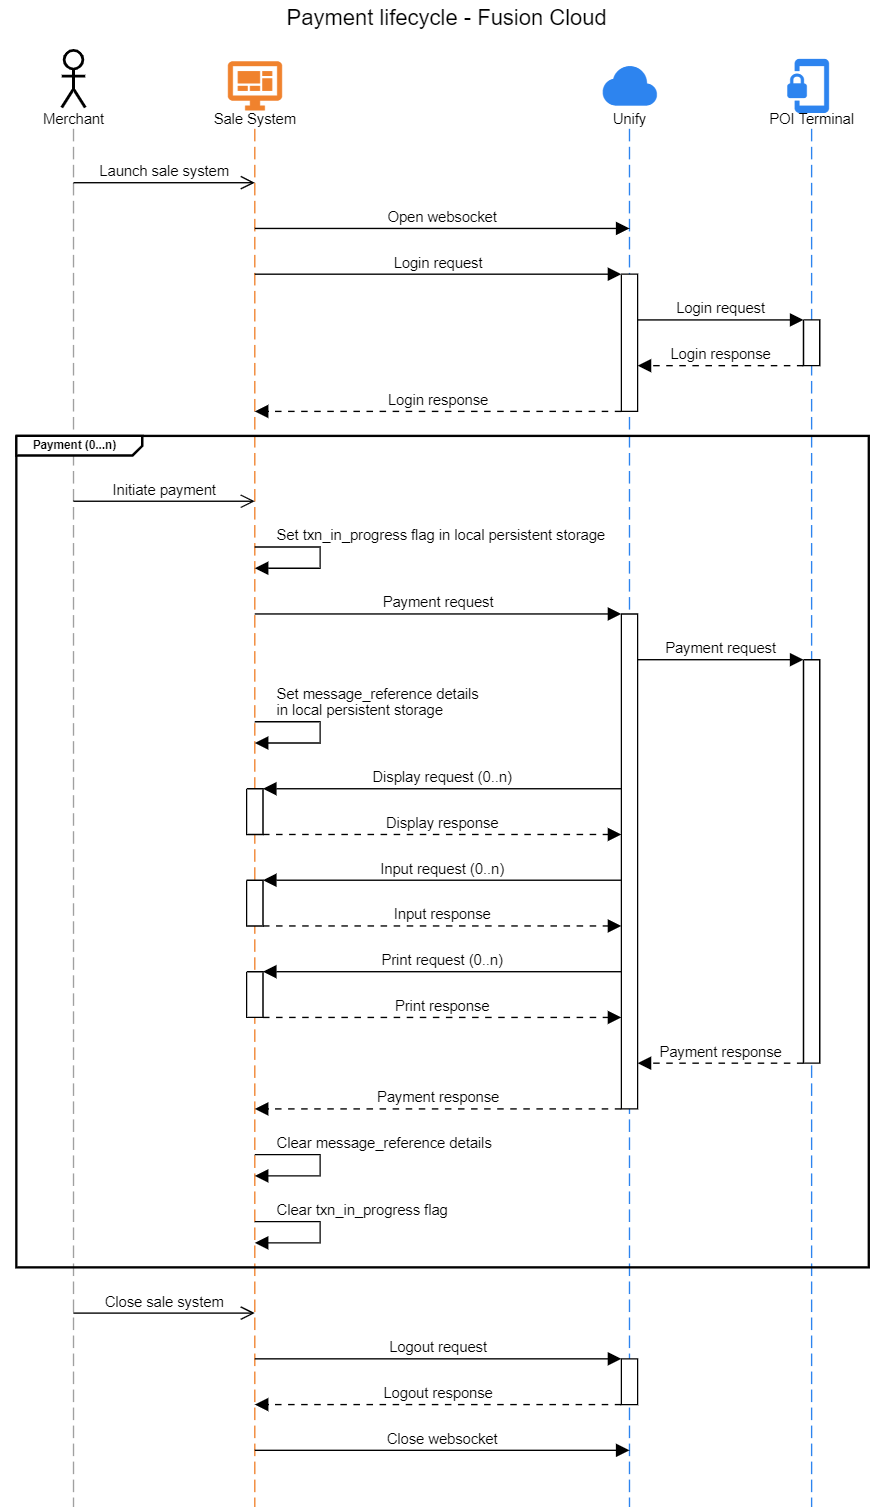
Fusion Cloud
The Fusion Cloud API allows the Sale System to communicate with a POI terminal via a Websocket connected to the DataMesh Unify switch.
Fusion Cloud payment lifecycle
- Merchant launches the Sale System.
- Sale System opens the websocket connection.
- Sale System has the option to link with a POI Terminal by performing a login request either:
- When the Sale System launches or
- Before the first payment request is sent
- Sale System receives a successful login response.
- Merchant initiates a payment.
- Sale System sets txn_in_progress flag in local persistent storage. (This is will be used for error handling.)
- Sale System sends a payment request.
- Sale System saves message reference details in local persistent storage. (This is will be used for error handling.)
- Sale System handles display requests, print requests, and input requests
- Sale System receives a payment response.
- Sale System clears the message reference details in the local persistent storage.
- Sale System clears the txn_in_progress flag in the local persistent storage.
- Merchant closes the Sale System.
- Sale System can optionally send a logout request.
- Sale System closes the websocket.
Mandatory features checklist
The table below provides an overview of the mandatory integration requirements which are required for your selected integration type.
| Integration Requirement | Fusion App | Fusion Satellite | Fusion Cloud |
|---|---|---|---|
| Implement the payment lifecycle (Fusion App, Fusion Satellite, Fusion Cloud) | ✔ | ✔ | ✔ |
| Support for purchase and refund payment types | ✔ | ✔ | ✔ |
| Support for Fusion Fuel API (for Sale Systems which support fuel payments) | ✔ | ✔ | |
| Support for Fusion Stored Value API | ✔ | ✔ | |
| Include product data in each payment request | ✔ | ✔ | ✔ |
| Support for TLS and other security requirements | ✔ | ✔ | |
| Additional fields will be added to the message specification over time. To ensure forwards compatibility the Sale System must ignore when extra objects and fields are present in response messages. This includes valid MAC handling in the SecurityTrailer. | ✔ | ||
| Implement Sale System settings requirements | ✔ | ||
Implement Payments user interface which handles the Initial UI, Final UI, Display UI, and Cancelling a Sale in Progress | ✔ | ||
| Handle error scenarios as outlined in error handling | ✔ | ✔ | |
| Ensure Sale System provides a unique payment identification | ✔ | ✔ | ✔ |
| Pass the accreditation test script | ✔ | ✔ | ✔ |
Design your integration
Before development commences, you should familiarise yourself with the DataMesh payment platform, including the mandatory and optional features available.
This will enable you to scope the development work required to complete the DataMesh integration with your Sale System.
You should refer to the accreditation test script as a guide to ensure that the Sale System has successfully implemented the mandatory integration requirements for your integration type.
The list of mandatory requirements are listed in the Mandatory Features Checklist section.
Depending on your Sale System design, other features may be required.
Other features available
- Sale System receipt printing
- Payments user interface for all displays and inputs
- Cash out
- Settlement
- Tokenisation
- Tipping
- Dynamic surcharge
- Pre-authorisation / completion
For help on scoping your development work, or to discuss integration requirements, please contact the DataMesh integrations team at integrations@datameshgroup.com
Sale System settings
Sale System settings are only required for the Fusion Cloud integration type. If you are using Fusion App or Fusion Satellite you can skip this section.
The Sale System must support configuration of settings to identify the Sale System to DataMesh, and to pair a POI Terminal to a Sale System.
Static Sale System settings
Static Sale System settings are provided by DataMesh and are linked to the build of the Sale System. i.e. they will be the same for all merchants using the Sale System build.
These settings can be contained in a database or configuration file editable by a Sale System engineer, or hard coded into the Sale System build.
Regardless of where they are stored, the Sale System must ensure the cashier or merchant is never required to configure the static settings, as they will not be aware of the required values.
DataMesh will provide two sets of static settings; one set for the test environment, and one set for production. It is the responsibility of the Sale System to ensure the correct values are included in a test or production build.
The static Sale System settings are
| Attribute | Requ. | Format | Description |
|---|---|---|---|
| ProviderIdentification | ✔ | String | The name of the company supplying the Sale System. Provided by DataMesh. Sent in the login request. |
| ApplicationName | ✔ | String | The name of the Sale System application. Provided by DataMesh. Sent in the login request. |
| SoftwareVersion | ✔ | String | Must indicate the software version of the current Sale System build. Sent in the login request. |
| CertificationCode | ✔ | String | Certification code for this Sale System. Provided by DataMesh. Sent in the login request. |
Cashier configurable settings
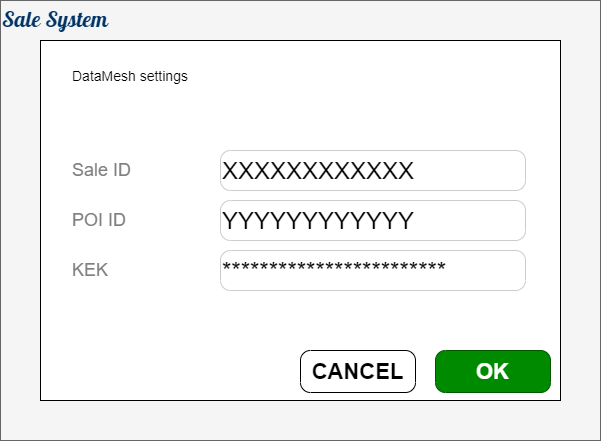
The SaleID, KEK, and POIID are cashier configurable settings which may be different for each lane. These fields authenticate a Sale System, and pair a Sale System to a POI terminal.
DataMesh offers QR code pairing to simplify entry of the SaleID, POIID, and KEK. The Sale System should still support manual entry of the SaleID, POIID, and KEK as a fallback for when QR POS pairing is not possible.
The Sale System must ensure there is a user interface accessible by the cashier which enables these settings to be configured.
The SaleID and POIID should be visible to the cashier. The KEK should be masked after entry by the cashier.
If the Sale System is to support many-to-one configuration (i.e. one Sale System linked to many POI terminals) it should support the entry of SaleID and KEK to identify the Sale System lane, and a POIID for each POI terminal linked.
Example setting UI
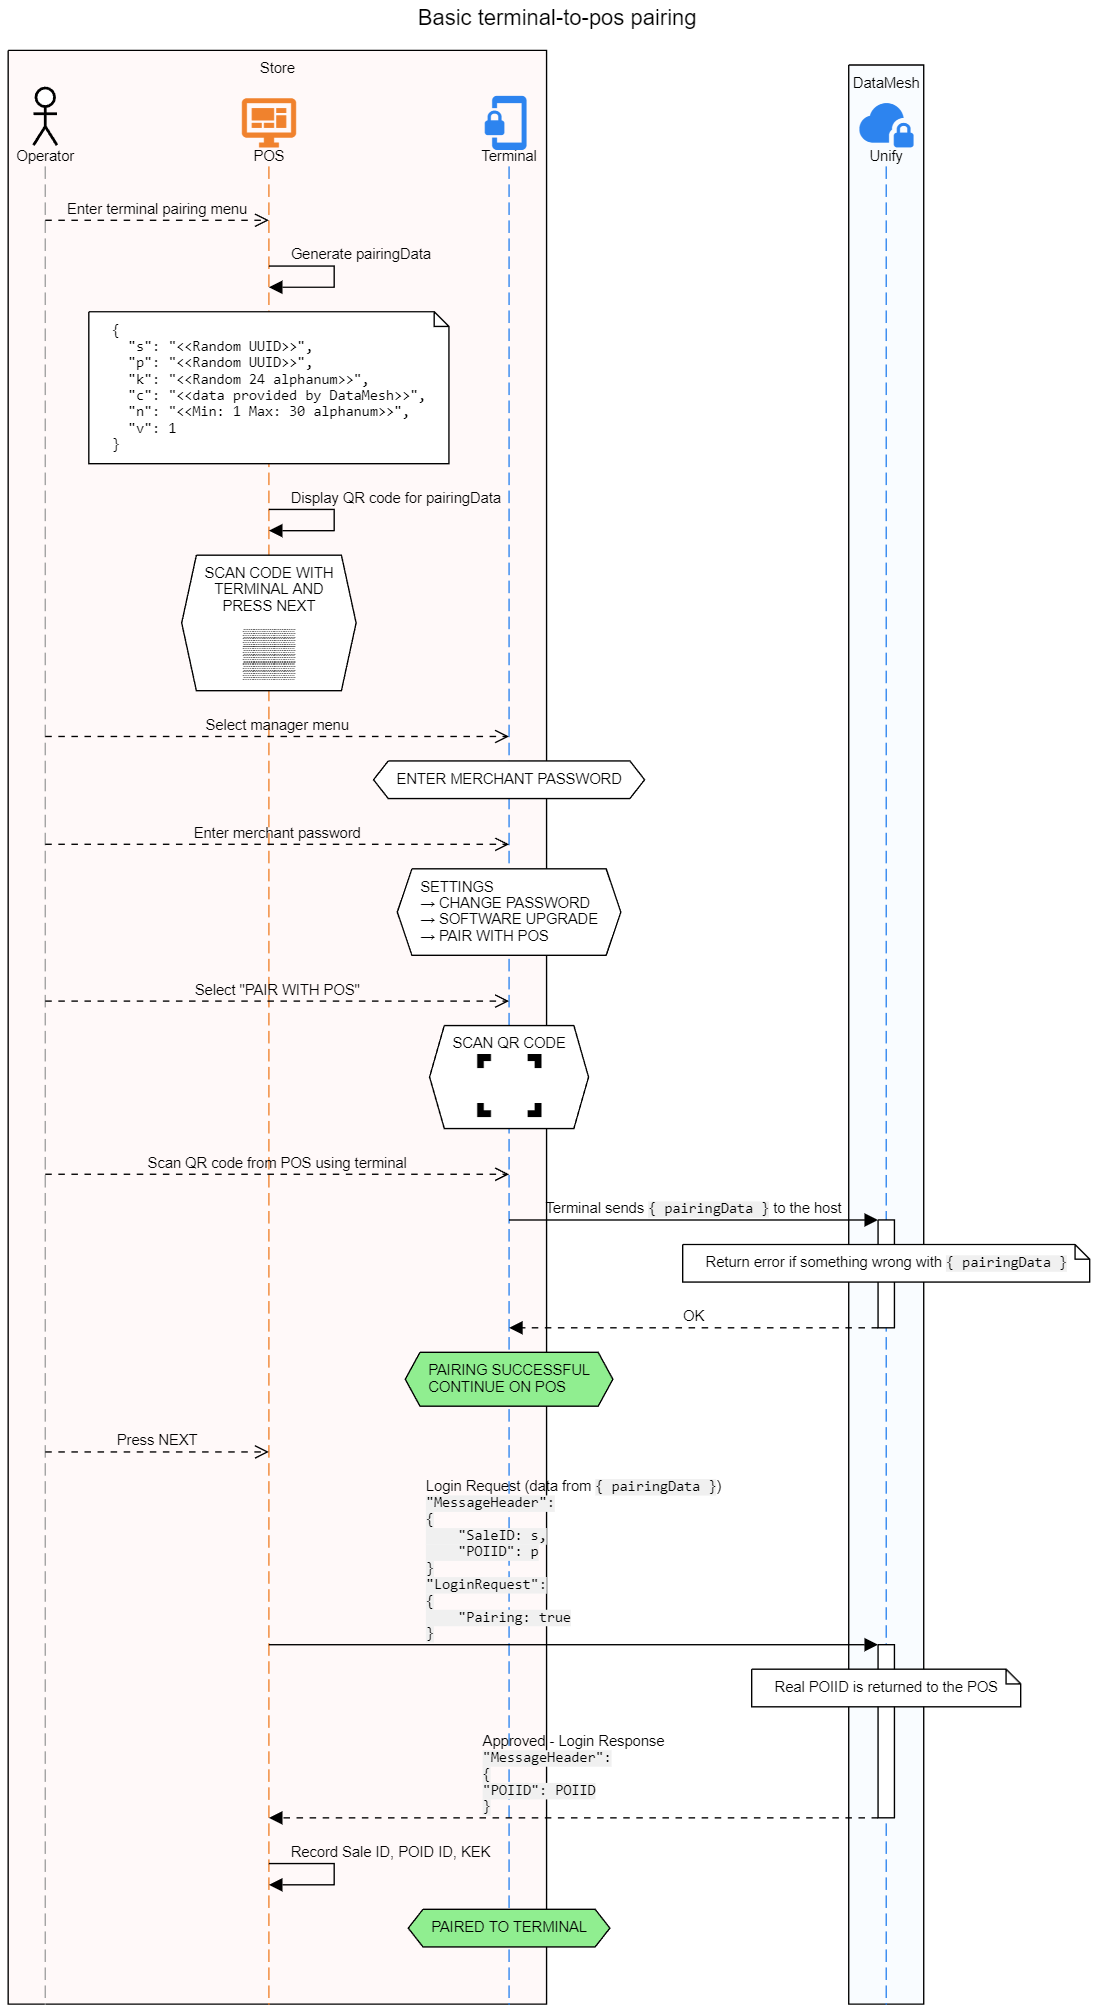
QR code pairing
QR code pairing enables configuration of the configurable settings (i.e. SaleID, POIID, and KEK) without requiring manual entry by the cashier.
How this works:
- Sale System generates a pairing QR code which contains pairing credentials, and displays it on the Sale System screen.
- The QR code is scanned by the POI Terminal.
- The Sale System sends a pairing login request and saves the POIID returned by DataMesh, along with the SaleID and KEK generated by the POS.
Sale System settings are only required for the Fusion Cloud integration type.
Fusion App already supports QR code pairing out-of-the-box.
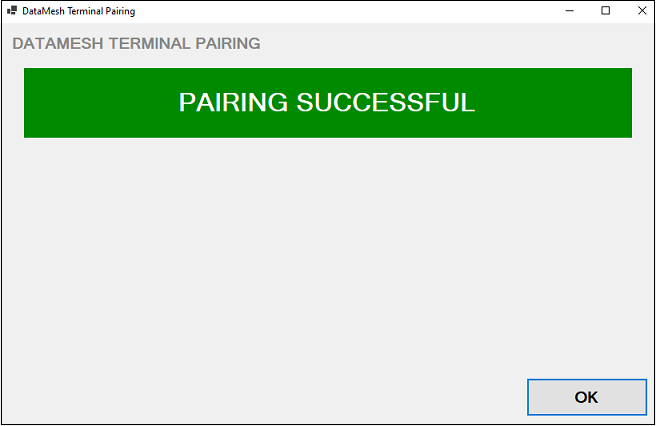
Step 1 - generate a pairing QR code
The pairing QR code:
- will represent the pairing data JSON.
- will be version 8 binary format (max length: 152) with Medium ECC.
To minimise the size of the data in the QR code, a abbreviated JSON fields format is used.
| JSON property | Name | Format |
|---|---|---|
| s | SaleID | String. Random UUID v4. 8-4-4-4-12 format. |
| p | PairingPOIID | String. Random UUID v4. 8-4-4-4-12 format. |
| k | KEK | String. Random. 48-character string populated with characters 0-9, and A-F. Please refer to the sample KEK generation |
| c | CertificationCode | String. Certification code provided by DataMesh. |
| n | POSName | String. POS display name with at most 30 characters. This can be the Work Station name or any name that you prefer. Name displayed on the report and on the Satellite app (e.g. during a POS payment transaction). |
| v | Version | Numeric. Pairing version code. Set to 1. |
Sample Pairing QR Code Data
{
	"s": "09c04710-265f-4094-88ee-a981794127f8",
	"p": "a2381e7c-1303-44de-ac3b-5fe68a0d973d",
	"k": "86BB447CE6D1C56E33C2717BE03EED579B2EAB7EC9465817",
	"c": *replace with data provided by DataMesh*,
	"n": "WorkStation 001",
	"v": 1
}
Sample KEK Generation
string chars = "0123456789ABCDEF";
string result = "";
Random random = new();
for (int i = 0; i < 48; i++)
{
  result += chars[random.Next(chars.Length)];
}
Console.WriteLine("KEK = " + result);

//Sample output
KEK = 86BB447CE6D1C56E33C2717BE03EED579B2EAB7EC9465817
Reference code
| Development Language | Description | Location |
|---|---|---|
| .Net | .Net NuGet package | on Nuget |
| Source Code | on GitHub | |
| Demo Application using the Pairing NuGet package | on GitHub |
Step 2: Scanning the QR code on the POI Terminal
Use these instructions to scan the pairing QR code on the POI Terminal.
Step 3: LoginRequest after pairing
Once the QR code has been scanned on the POI Terminal, the Sale System must send a pairing LoginRequest:
- Build a standard login request
- Set MessageHeader.SaleID to the pairing QR code SaleID value
- Only for this specific request, set MessageHeader.POIID to the pairing QR code PairingPOIID value
- Set LoginRequest.SaleSoftware.CertificationCode to the pairing QR code CertificationCode value
- Set LoginRequest.Pairing to true
On successful login response, the Sale System should record:
- MessageHeader.POIID from the response (this will be different from the MessageHeader.POIID in the request)
- SaleID from the pairing QR Code SaleID value
- KEK from the pairing QR Code KEK value
The stored Sale ID, POI ID (from the Login response), and KEK values will be used in the succeeding request messages (including the actual LoginRequest prior to a PaymentRequest).
Unpairing from Terminal
Once the Sales System has been paired with a terminal, the Sale System must provide an option to unpair the Sale Sytem from the terminal. This option will clear the previously stored POI ID value.
The Sale System may use the previously stored Sale ID and KEK values when generating the next pairing QR code.
Sample Terminal-to-POS Pairing Dialog
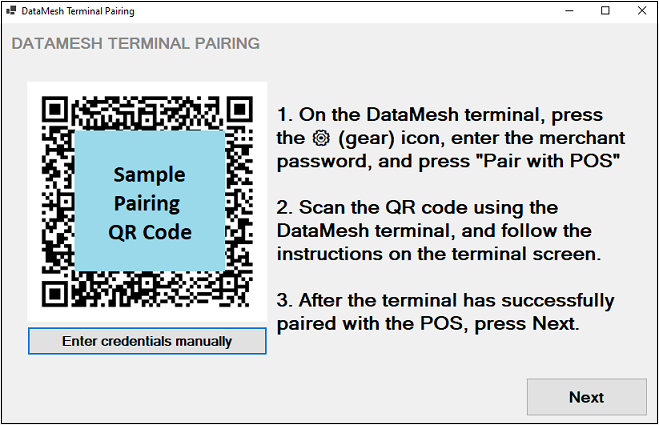
Sample screen display when LoginRequest after pairing is successful
Sample screen display when no terminal is paired with the Sale System
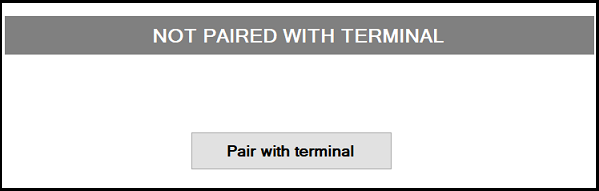
Sample screen display when a terminal has been paired successfully with the Sale System

Payment types
Supported payment types are:
- Purchase
- Cash-Out
- Purchase with Cash-Out
- Refund
- Pre-authorisation
- Pre-authorisation cancel
- Completion
The Sale System indicates the payment type in the payment request with the PaymentType field.
Supported gift card types are:
- Activation
- Deactivation
Payment identification
Sale & payment identification
- In the Fusion API, a sale is a transaction between a buyer and a seller, in which goods or services are exchanged for payment.
- Each sale can be pair for by one or more payment requests.
- Each payment request and response message is identified by a
TransactionIdentificationobject which contains following the fields:
| Message | TransactionIdentification field | Description |
|---|---|---|
| Payment Request | SaleData.SaleTransactionID |
|
| Payment Response | SaleData.POITransactionID |
|
Request/response identification
- The ServiceID field uniquely identifies a specific transaction request in a sale.
- Each transaction request and response message are linked via the ServiceID field.
- When processing a response message, the Sale System should verify that the ServiceID in the payment response or transaction status response message matches the exact ServiceID value in the payment request message before processing the response message.
- The ServiceID is also used by the Sale System in the abort transaction request to cancel a specific payment transaction. This means that the exact ServiceID value in the payment request must be provided as the ServiceID in the abort transaction request when attempting to cancel that specific payment request.
Receipt printing
The POI Terminal will produce payment receipts which must be printed as a part of the transaction flow.
Some terminals have a built-in printer which can handle receipt printing. However, in order to support terminals without a built-in printer and improve the customer experience the Sale System should also handle printing receipts produced by the POI Terminal.
To enable printing receipts from the Sale System, include "PrinterReceipt" in the list of available SaleTerminalData.SaleCapabilities when sending the LoginRequest.
The Sale System must print the receipt as formatted by DataMesh and not create a custom formatted receipt.
Receipts may be delivered to the Sale System using two methods
- PrintReceipt request - One or more PrintReceipt requests may fire during the sale
- Payment response - A customer receipt is returned in the payment response in OutputContent.OutputXHTML formatted as the format defined in OutputContent.OutputFormat
It is recommended that the Sale System embed the customer payment receipt content in the customer sale receipt produced by the Sale System.
Example receipt format
*** CUSTOMER COPY ***
DD/MM/YYYY hh:mm:ss
Merchant ID: XXXXXXXX
Terminal ID: XXXXXXXX
Purchase Transaction
Amount: $10.00
Tip: $1.00
Surcharge 2.00%: $0.22
-----------------------
Total Amount: $11.22
VISA: 4xxxxxxxxxxxxxxx(T)
Credit Account
Approved
Reference: 0000 0000 0000
Auth Code: 000000
AID: A0000000000000000
ATC: 000X
TVR: 000000000000
ARQC: XXXXXXXXXXXXXXXX
Payment user interface
The payment user interface settings are only required for the Fusion Cloud integration type. If you are using Fusion App or Fusion Satellite you can skip this section.
The Sale System should implement Initial UI, Final UI, Display UI and the ability to cancel a sale in progress.
The Input UI elements are not currently available, and will be supported by a future Unify release. Support for these elements by the Sale System is optional.
If capable, the Sale System should present UI to the cashier for the duration of a payment. The content of the UI is set by the input and display request messages sent from the POI System.
In the examples presented below the UI is contained in a modal shadow box. This is an example to help illustrate how this UI may be implemented. The Sale System should implement this UI in a way that fits the look and feel of the rest of the system.
The Sale System must not block communication with the POI System when displaying the payments UI. The POI System may send a display or input request, followed by another display or input request, or the payment response. For example, the POI System may send a "SELECT ACCOUNT" display, followed by a "PROCESSING" display when the card holder selects their account on the POI terminal. The POI System may send a "SIGNATURE APPROVED" input request, followed by a "TIMEOUT" display and payment response, if the cashier doesn't approve the signature in time.
To enable display and input handling on the Sale System, SaleTerminalData.SaleCapabilities in the login request contains "CashierStatus", "CashierError", "CashierInput", and "CustomerAssistance".
The DataMesh Nexo API is event based. The Sale System sends a payment request, handles events as they are received, and eventually receives a payment response.
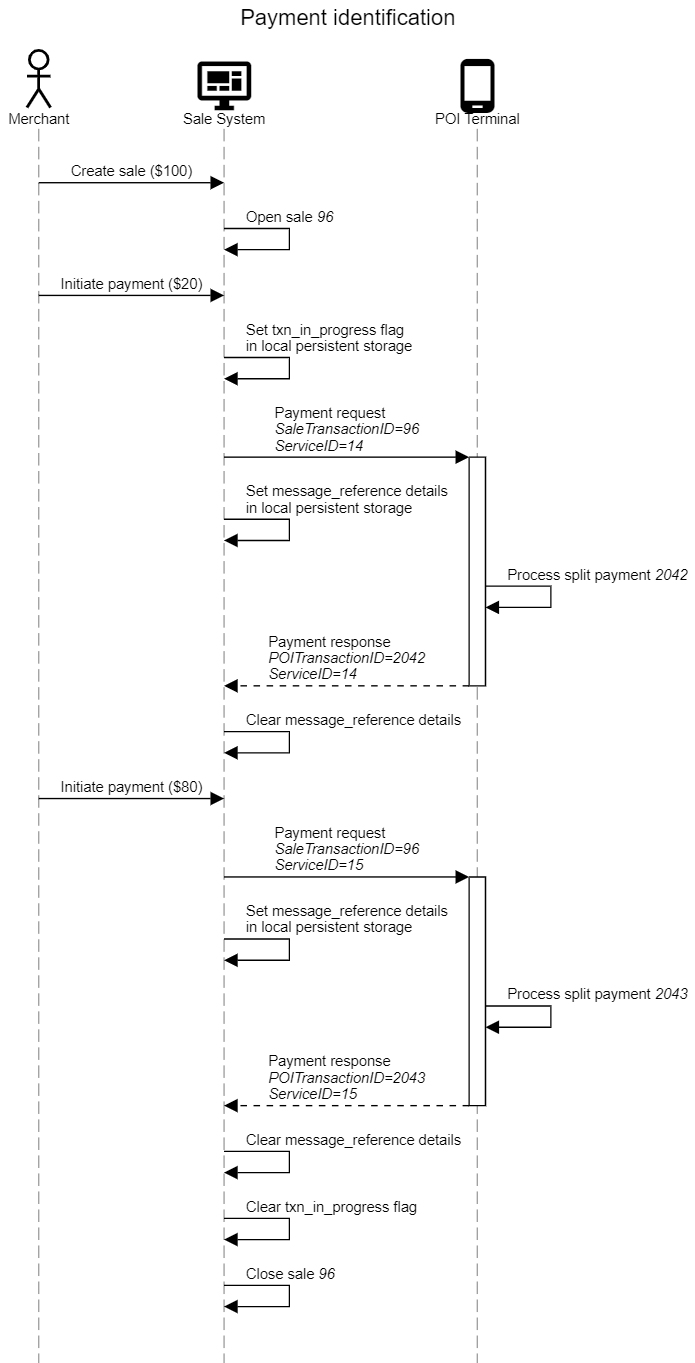
Initial UI
The Sale System should immediately display an initial UI after sending a payment request which informs the cashier the payment is in progress. This UI is required to handle instances where the first display/input message from the POI System is not present, or delayed.
This UI should also enable the cashier to request a cancellation of the transaction.
Example
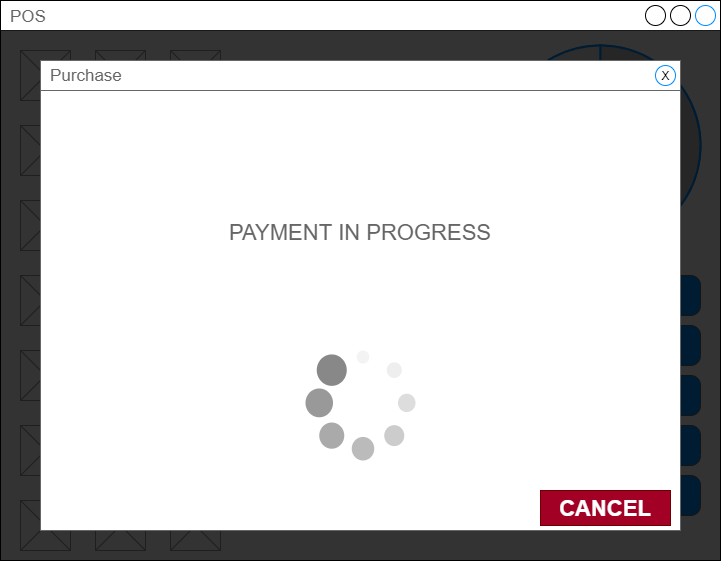
Display UI
Display request
{
   "SaleToPOIRequest":{
      "MessageHeader":{
         "MessageClass":"Device",
         "MessageCategory":"Display",
         "MessageType":"Request",
         "ServiceID":"xxx",
         "DeviceID":"xxx",
         "SaleID":"xxx",
         "POIID":"xxx"
      },
      "DisplayRequest":{
         "DisplayOutput":{
            "ResponseRequiredFlag":false,
            "Device":"CashierDisplay",
            "InfoQualify":"Status",
            "OutputContent":{
               "OutputFormat":"Text",
               "OutputText":{
                  "Text":"LINE OF TEXT MAX 40 CHARACTERS"
               }
            }
         }
      },
      "SecurityTrailer":{...}
   }
}
The POI system will send zero or more display request messages to the Sale System during a transaction. The Sale System should display these messages and continue to wait for the payment response.
- Each display request will contain at least 1 line of text.
- Each line of text will be up to 40 characters wide.
- The POI System should display the text centred.
- The POI System should include the option to cancel the transaction.
- The POI System should display an "in progress" indicator to the cashier.
- The POI System may optionally colour the display text based on the InfoQualify field set as "Error" or "Status"
Example
Input UI
The Input UI elements are not currently available, and will be supported by a future Unify release. Support for these elements by the Sale System is optional.
The POI system will send zero or more input request messages to the Sale System during a transaction. The Sale System should display these input requests, allow the cashier the option to answer the input request, and continue to wait for the payment response. The Sale System should not block on an input request, as the POI System may continue with the transaction before the Sale System has sent an input response.
- There are six types of input request. The InputCommand indicates which input request type the Sale System should present:
- GetAnyKey - Wait for any key press. For example, to get confirmation from the cashier that a display has been read.
- GetConfirmation - Yes/No answer as in the case when prompting for "Signature OK?". The result of this command is boolean true/false.
- Password - A merchant password as in the case during a refund transaction.
- GetMenuEntry - A selection from a list of options. For example, assisting the card holder by selecting the account type: Savings, Cheque or Credit.
- TextString - A text string.
- DigitString - A string of digits.
- DecimalString - A string of digits with a decimal point.
- The input request has a single line of text, up to 40 characters wide.
- The POI System should display the text centred.
- The POI System should include the option to cancel the transaction.
- The MinLength and MaxLength fields may be present for some input commands.
- The MaxInputTime field may be present which indicates the input timeout in seconds.
Input - GetAnyKey
An InputCommand of "GetAnyKey" indicates the Sale System should wait for any key press. This is most often used to display a request which the cashier must acknowledge to continue.
Example

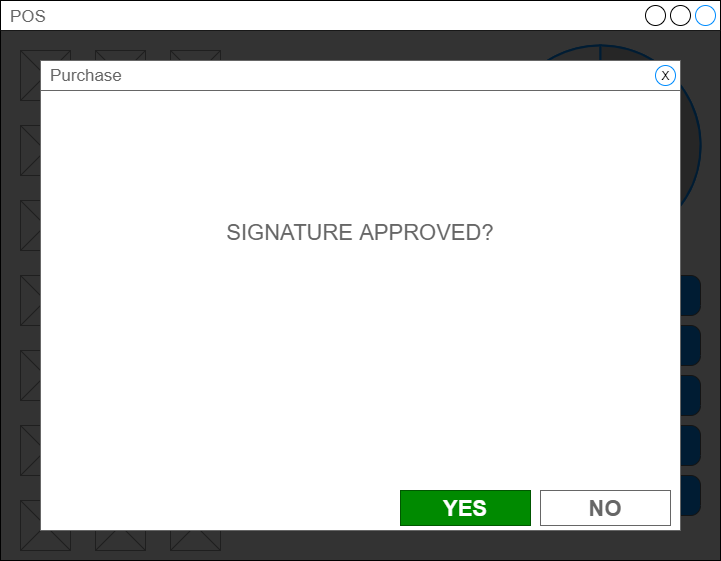
Input - GetConfirmation
An InputCommand of "GetConfirmation" indicates the Sale System should present a yes/no option to the cashier. The response to this request is boolean true/false.
The option for the cashier to 'Cancel' is optional on the GetConfirmation input UI.
Example
Input - Password
An InputCommand of "Password" indicates the Sale System should allow the user to enter text of any format as a password.
The Sale System should ensure cashier input conforms to MinLength and/or MaxLength fields if they are present and display an informational error if it does not.
The MaskCharactersFlag field indicates if the Sale System should mask the cashier input on screen.
Example

Input - TextString
An InputCommand of "TextString" indicates the Sale System should allow the user to enter text of any format.
The Sale System should ensure cashier input conforms to MinLength and/or MaxLength fields if they are present and display an informational error if it does not.
Example

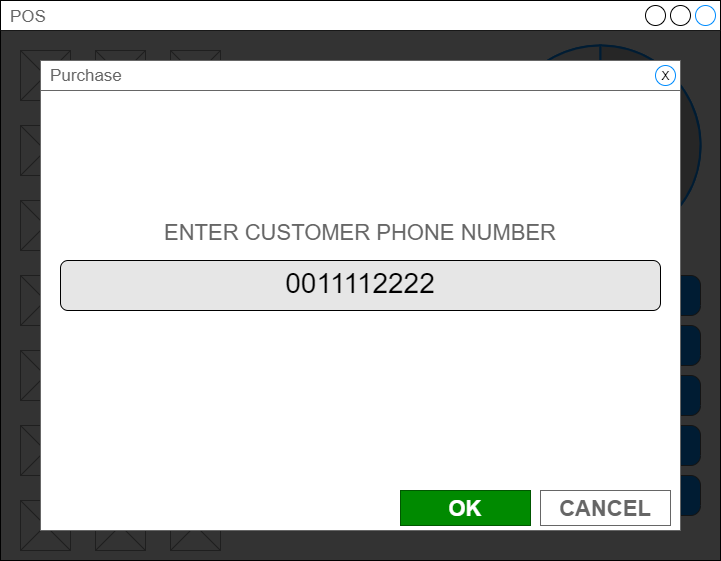
Input - DigitString
An InputCommand of "DigitString" indicates the Sale System should allow the user to enter a string of digits only.
The Sale System should ensure cashier input conforms to MinLength and/or MaxLength fields if they are present and display an informational error if it does not.
Example
Input - DecimalString
An InputCommand of "DigitString" indicates the Sale System should allow the user to enter a string of digits with a decimal point (e.g. an amount)
The Sale System should ensure cashier input conforms to MinLength and/or MaxLength fields if they are present and display an informational error if it does not.
Example

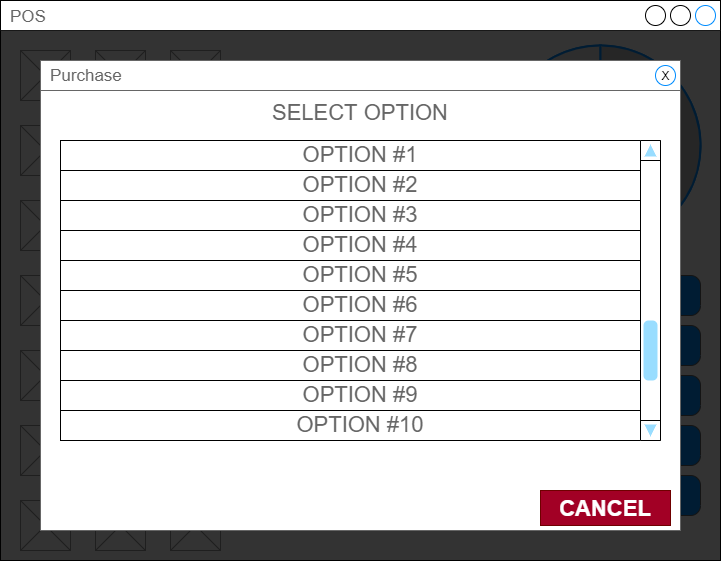
Input - GetMenuEntry
An InputCommand of "GetMenuEntry" indicates the Sale System should allow the cashier to select one of a number of options available.
The number of available options will be 1..n. The MenuEntry object contains the options to be displayed.
Example
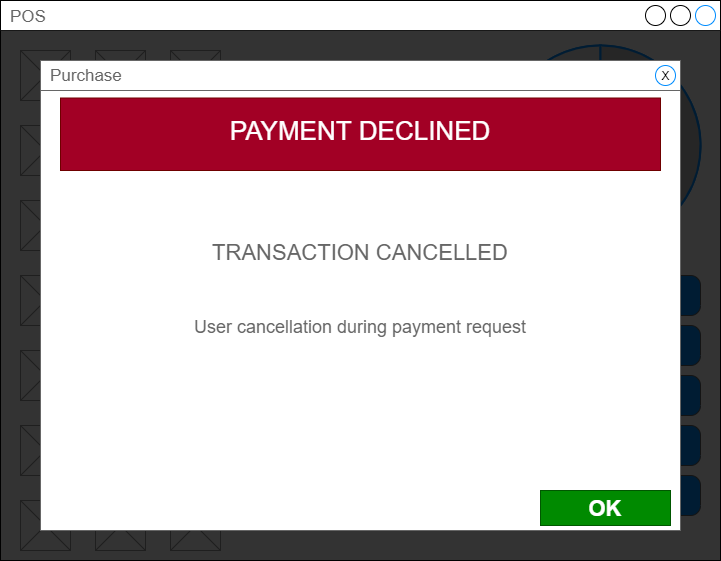
Final UI
The Sale System should display a final UI after the response has been received to inform the cashier of the transaction result.
This UI is constructed using the Result, ErrorCondition, and AdditionalResponse fields of the Response object.
Result="Success" Example

Result="Failure" Example
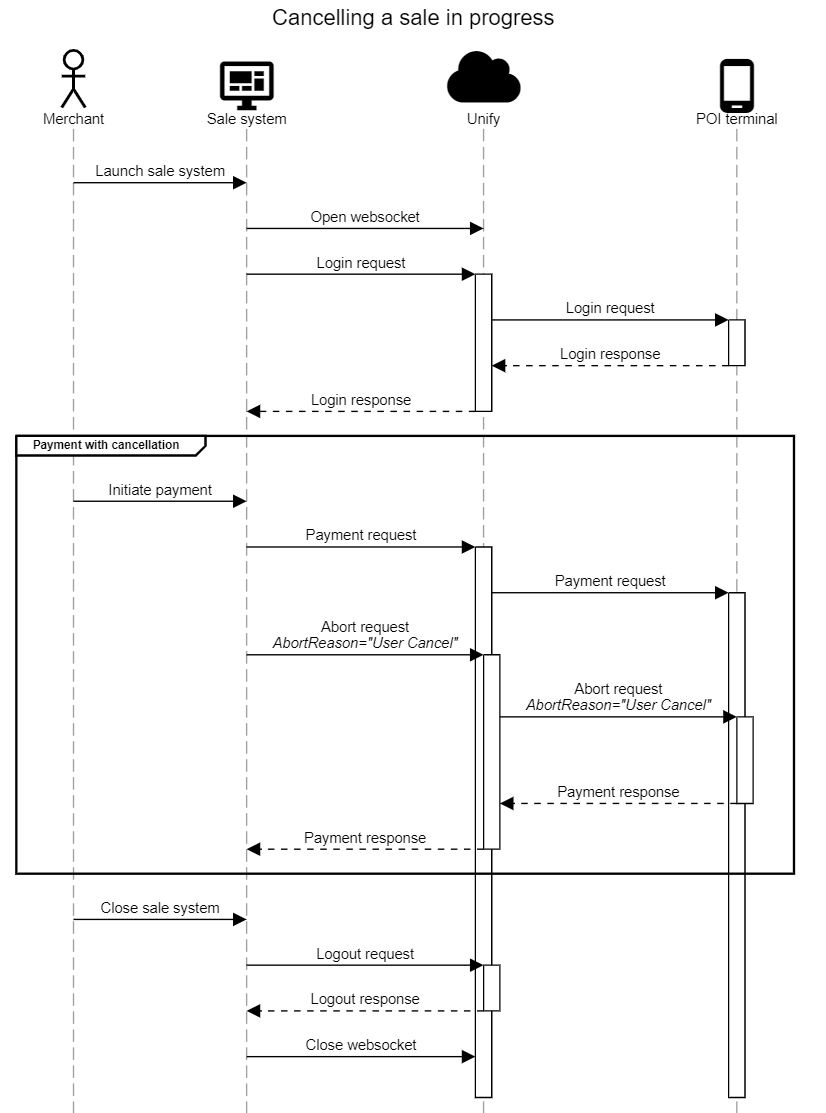
Cancelling a sale in progress
Whilst a payment is in progress the Sale System should present UI to the cashier which enables them to request a cancellation of the payment.
If the cashier initiates a payment cancellation, the Sale System sends an abort transaction request (with AbortRequest.AbortReason field set to "User Cancel"). Then, the Sale System continues to wait for the payment response.
The Sale System may allow the cashier to continue to request cancellation of the payment until a payment result has been received.
There are a number of instances where the Terminal may be unable to cancel a payment in progress upon receiving a abort transaction request. The Sale System must always await a payment response after sending an abort transaction request. If no response is received or an error has occurred before a response is received, the Sale System must peform error handling.
Product data
Product data is mandatory for all requests.
The Sale System must include product information about the sale items attached to each purchase request.
It can accomplish this by including an array of SaleItem objects in the PaymentRequest.
Each SaleItem record contains the following mandatory fields:
- ItemID a unique identifier for the sale item within the context of this payment. e.g. a 0..n integer which increments by one for each sale item.
- ProductCode - a unique identifier for the product within the merchant, such as the SKU. For example if two customers purchase the same product at two different stores owned by the merchant, both purchases should contain the same
ProductCode. - ItemAmount - total amount of the sale item.
- ProductLabel - a short, human readable, descriptive name of the product. For example,
ProductLabelcould contain the product name typically printed on the customer receipt. - Quantity - item unit quantity
- UnitOfMeasure - unit of measure of the
Quantity. See UnitOfMeasure - UnitPrice - price per item unit.
See SaleItem for all available fields and examples.
Including all available product information in each payment request will improve the merchant experiance. See SaleItem for a full list of available fields.
Refunds
Refund is paying back the customer the amount corresponding to some or all of the goods/services that the customer previously availed. The total refund amount must include any surcharge amount applied to the specific goods/services in the original sale transaction.
Types of Refund:
More details about the refund implementation.
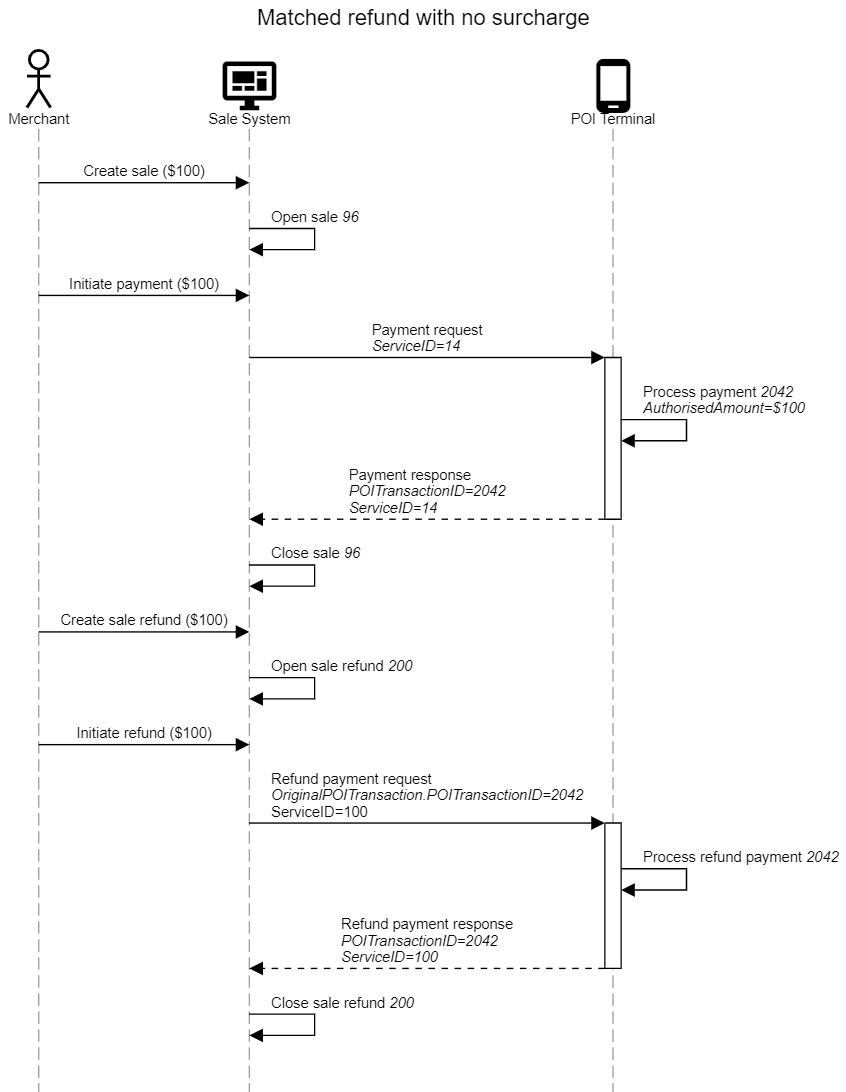
Matched refund
- A matched refund is paired with an original purchase.
- The Sale System must specify the POITransactionID from the original payment response message in the OriginalPOITransaction field of the refund payment request message.
- When dynamic surcharge is enabled:
- The matched refund should include the surcharged amount.
- The total amount must be equal to the original purchase amount + dynamic surcharge amount.
- When dynamic surcharge is "NOT" enabled:
- The total amount must be equal to the original purchase amount.
Unmatched refund
- An unmatched refund is not paired with an original purchase.
- Unmatched refunds don't have any extra requirements/restrictions.
- When dynamic surcharge is enabled:
- The total amount must be equal to the purchase amount to be refunded + portion of the surcharge amount, which corresponds to the purchase amount to be refunded.
Currently, both Matched and Unmatched refunds involve POI Terminal and card interaction.
Cash out
The Sale System can optionally support cash out payments on the POI Terminal. There are two cash out methods supported based on where the cash out amount is entered; cash out on Sale System, and cash out on POI Terminal.
Cash out on Sale System
When perfoming cash out on the Sale System, the cash out amount is entered by the cashier on the Sale System before the purchase is sent.
A cash out sale can be cash out only, or cash out + purchase.
- Cash out only (no sale items are included)
- Set PaymentData.PaymentType to "CashAdvance"
- Set PaymentTransaction.AmountsReq.RequestedAmount to the cash out amount
- Set PaymentTransaction.AmountsReq.CashBackAmount to the cash out amount
- Purchase plus cash out (sale items are included)
- Set PaymentData.PaymentType to "Normal"
- Set PaymentTransaction.AmountsReq.RequestedAmount to the value of the sale items, plus the cash out amount
- Set PaymentTransaction.AmountsReq.CashBackAmount to the cash out amount
Pre-authorisation / completion
The pre-authorisation payment flow allows the Sale System to reserve funds on a customer's card, enabling the payment to be completed at a later time.
Pre-authorisation, pre-authorisation top-up, and completion have specific implementation requirements and limitations. Please task to the DataMesh integrations team before implementing this feature.
Pre-authorisation
A pre-authorisation must be finalised by a completion or pre-authorisation cancel.
The pre-authorisation allows the Sale System to reserve funds on a customers card, enabling the payment to be completed at a later time.
To perform a pre-authorisation:
- Construct a payment request
- Set PaymentRequest.PaymentData.PaymentType to "FirstReservation"
- Set PaymentRequest.PaymentTransaction.AmountsReq.RequestedAmount to the amount to reserve
- Set PaymentRequest.SaleData.SaleReferenceID to a unique UUID. Note this value must be included in the matching completion.
- Set PaymentRequest.SaleData.TokenRequestedType in the payment request to "Customer".
- Populate SaleItem[] with the products
On pre-authorisation response, the POS must record:
- PaymentRequest.SaleData.SaleReferenceID from the request
- PaymentResponse.POIData.POITransactionID from the response
- PaymentResponse.PaymentResult.AmountsResp.AuthorizedAmount from the response (the reserved amount)
- PaymentResponse.PaymentInstrumentData.CardData.PaymentToken.TokenValue from the response
Pre-authorisation top-up
The value of RequestedAmount in a pre-authorisation top-up request must be greater than or equal to the AuthorizedAmount returned in the preceding pre-authorisation or top-up response.
The pre-authorisation top-up allows the Sale System to increase the value of a pre-authorisation request.
To perform a pre-authorisation top-up:
- Construct a payment request
- Set PaymentRequest.PaymentData.PaymentType to "UpdateReservation"
- Set PaymentRequest.PaymentTransaction.AmountsReq.RequestedAmount to the new amount to reserve. Must be equal or greater than the
AuthorizedAmountfrom the preceding pre-authorisation or top-up response - Set PaymentRequest.SaleData.SaleReferenceID to the same
SaleReferenceIDas used in the pre-authoristaion request - Set PaymentRequest.PaymentTransaction.OriginalPOITransaction.POITransactionID to the value returned in PaymentResponse.POIData.POITransactionID from the preceding authorisation response. This can be either from the original pre-authorisation, or from the previous pre-authorisation top-up when multiple top-ups have been performed.
- Set PaymentRequest.PaymentInstrumentData.CardData.EntryMode to "File"
- Set PaymentRequest.PaymentInstrumentData.CardData.PaymentToken.TokenRequestedType to "Customer"
- Set PaymentRequest.PaymentInstrumentData.CardData.PaymentToken.TokenValue to the value returned in PaymentResponse.PaymentInstrumentData.CardData.PaymentToken.TokenValue from the preceding pre-authorisation or top-up response
On pre-authorisation top-up response, the POS must record:
- PaymentRequest.SaleData.SaleReferenceID from the request
- PaymentResponse.POIData.POITransactionID from the response
- PaymentResponse.PaymentResult.AmountsResp.AuthorizedAmount from the response (the reserved amount)
- PaymentResponse.PaymentInstrumentData.CardData.PaymentToken.TokenValue from the response
Completion
The value of RequestedAmount in a completion request must be less than or equal to the AuthorizedAmount returned in the preceding pre-authorisation or top-up response.
Completion captures payment of the amount previously reserved through pre-authorisation.
To perform a completion:
- Construct a payment request
- Set PaymentRequest.PaymentData.PaymentType to "Completion"
- Set PaymentRequest.PaymentTransaction.AmountsReq.RequestedAmount the completion amount. Must be less than or equal to the
AuthorizedAmountfrom the preceding pre-authorisation or top-up response - Set PaymentRequest.SaleData.SaleReferenceID to the same
SaleReferenceIDas used in the original pre-authoristaion request - Set PaymentRequest.PaymentTransaction.OriginalPOITransaction.POITransactionID to the value returned in PaymentResponse.POIData.POITransactionID from the preceding pre-authorisation or pre-authorisation top-up response
- Set PaymentRequest.PaymentInstrumentData.CardData.EntryMode to "File"
- Set PaymentRequest.PaymentInstrumentData.CardData.PaymentToken.TokenRequestedType to "Customer"
- Set PaymentRequest.PaymentInstrumentData.CardData.PaymentToken.TokenValue to the value returned in PaymentResponse.PaymentInstrumentData.CardData.PaymentToken.TokenValue from the preceding pre-authorisation or top-up response
Pre-authorisation cancel
A successful pre-authorisation must be either completed, or cancelled. To cancel a pre-authorisation, the Sale System sends a ReversalRequest.
To perform a pre-authorisation cancel:
- Construct a reversal request
- Set ReversalRequest.OriginalPOITransaction.POITransactionID to the value returned in PaymentResponse.POIData.POITransactionID from the preceding pre-authorisation or pre-authorisation top-up response
- Set ReversalRequest.SaleData.SaleReferenceID to the same
SaleReferenceIDas used in the pre-authoristaion request - Set
ReversalReasonto"MerchantCancel".
Settlement
The Sale System can reconcile with the POI System periodically but should normally be once a day as it affects settlements with acquirers.
Use the Reconciliation request to initiate a settlement.
Tokenisation
Cards can be pre-tokenised by the Sale System if required. This supports mobile apps, eCommerce and Sale System type systems.
Customer tokens are supported:
- Customer - token which is scoped to the customer. For example, if the same card is tokenised on two different POI Terminals owned by the merchant, the same token will be returned. A
Customertoken can be used to represent the card holder and perform operations for a longer period.
Tokenise a card used for a payment
To tokenise a card as part of a payment, set SaleData.TokenRequestedType in the payment request to "Transaction" or "Customer".
When SaleData.TokenRequestedType is set, the token will be returned as part of the payment response in PaymentResult.PaymentInstrumentData.CardData.PaymentToken.
Tokenise a card without payment
The card acquisition request allows the Sale System to tokenise a card which can be used in future payment requests.
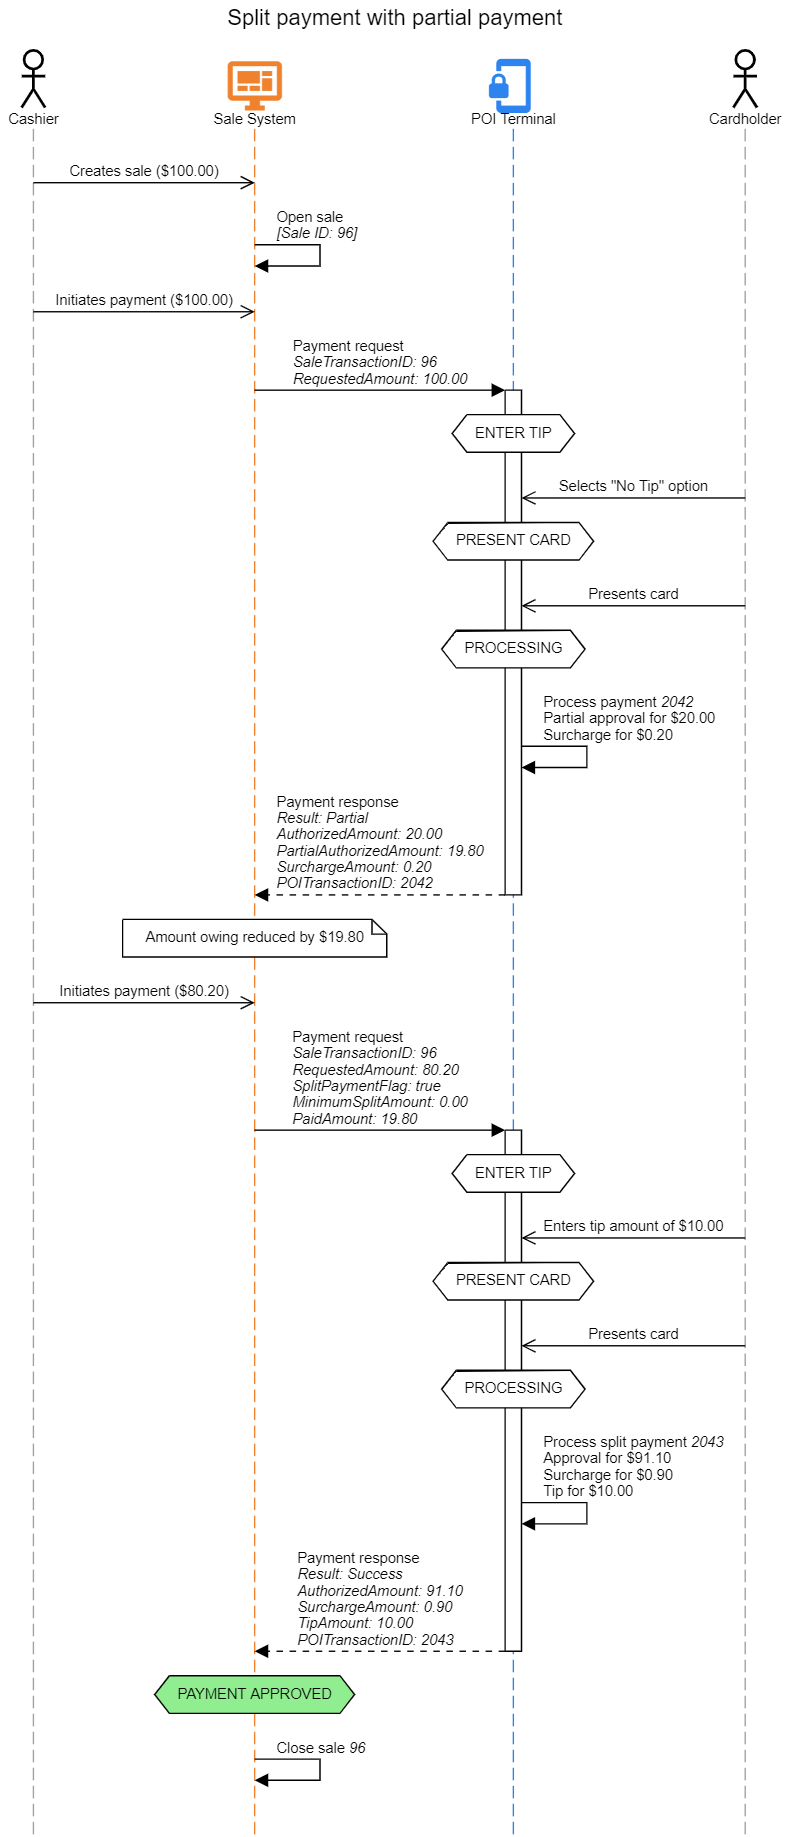
Partial payments
Partial payments are only supported in selected payment scenarios and requires the "PartialPayment" feature to be enabled in the terminal configuration. Contact the DataMesh integrations team before implementing partial payments.
When the "PartialPayment" feature is enabled, the POI Terminal may approve a purchase for less than the RequestedAmount passed in by the Sale System.
This feature can be used in conjunction with split payments to accept loyalty and stored value card payments where the value available on the card may be less than the total RequestedAmount.
Handling a partial payment
- Ensure the "PartialPayment" feature has been enabled on the POI Terminal
- Send a payment request, including all required fields
- Set the maximum payable purchase amount in PaymentTransaction.AmountsReq.RequestedAmount
- Await the payment response and check Response.Result for the transaction result.
- If Response.Result is "Partial" the payment has been approved for an amount less than the the RequestedAmount
- PaymentResponse.Response.Result will be "Partial"
- PaymentResult.AmountsResp.AuthorizedAmount will reflect the full authorized amount (including all fees, tips, and surcharges)
- PaymentResult.AmountsResp.PartialAuthorizedAmount will reflect the amount of RequestedAmount which has been authorised.
- Reduce the sale amount owing by PartialAuthorizedAmount and offer the customer a way to provide further payment.
- If the remaining amount is to be paid using the POI Terminal, follow the steps outlined in split payments
Example
- Sale System sends payment request of $100.00 to DataMesh
- DataMesh terminal calculates an added surcharge of $1.00 and adds it to the total amount
- Cardholder presents a stored value card with $42 available
- DataMesh POI Terminal completes the payment for $42 and returns a response to the POS
- PaymentResponse.Response.Result is "Partial"
- PaymentResult.AmountsResp.AuthorizedAmount is $42.00
- PaymentResult.AmountsResp.PartialAuthorizedAmount is $41.00
- PaymentResult.AmountsResp.SurchargeAmount is $1.00
- Sale System reduces the outstanding amount by $41.00 and offers the cardholder the option to pay the remaining $59.00
Split payments
To perform a split payment, the Sale System should send multiple payment requests, one for each split.
Split is allowed when PaymentType is "Normal".
The following data elements should be set by the Sale System for a split payment in a payment request:
- All split payments which are part of the same sale should include the same SaleData.SaleTransactionID.
- PaymentTransaction.SaleItem array, which may reflect
- Just the items involved in that payment, in the case of a split basket.
- All the items in the sale, in the case the sale is being split by amount. Note when splitting by amount the sum of the item amounts could more than the RequestedAmount.
- PaymentTransaction.AmountsReq.RequestedAmount set to the amount of the split payment
- PaymentData.SplitPaymentFlag set to true
- PaymentTransaction.AmountsReq.MinimumSplitAmount set to the minimum split amount
- PaymentTransaction.AmountsReq.PaidAmount set to the total amount of previous split payment associated with this sale
An example, when splitting by sale item:
- A sale contains two items, "Product A" ($80) and "Product B" ($20)
- The card holder wishes to pay for each item with a different card
- The cashier sends the first payment for $80, the basket contains "Product A"
- The cashier sends a second payment for $20, the basket contains "Product B"
An example, when splitting by amount:
- A sale contains two items, "Product A" ($80) and "Product B" ($20)
- The card holder wishes to split the sale equally between two cards
- The cashier sends the first payment for $50, the basket contains both "Product A" and "Product B"
- The cashier sends a second payment for $50, the basket contains both "Product A" and "Product B"
An example, when splitting after a partial payment:
- A sale contains two items, "Product A" ($80) and "Product B" ($20)
- The card holder wishes to pay with a stored value card
- The cashier sends the payment request for $100, the basket contains both "Product A" and "Product B"
- The payment is partially approved for $40
- The Sale System reduces the outstanding amount by $40
- The cashier sends a second payment for $60, the basket contains both "Product A" and "Product B"
Tipping
There are two tipping methods supported; tip on Sale System, and tip on POI Terminal.
Tip on Sale System
When tipping on the Sale System the tip amount is entered by the cashier on the Sale System before the purchase is sent.
For example:
- Cashier prints a sale ticket for $100 and presents to the card holder
- Card holder signs and writes a tip of $10
- Cashier opens $100 sale on the Sale System, enters tip of $10 and initiates payment
- Sale System sends a payment request request to the POI Terminal and sets
- PaymentTransaction.AmountsReq.RequestedAmount to $110 (sale amount + tip)
- PaymentTransaction.AmountsReq.TipAmount to $10
- POI Terminal processes a payment of $110 and includes tip amount on the payment receipt
- POI Terminal approves payment and returns the result to the Sale System
If the PaymentTransaction.AmountsReq.TipAmount is set to 0 in the payment request, the Tip Entry screen will be displayed in the POI terminal.
Do not set PaymentTransaction.AmountsReq.TipAmount to 0 if you don't want the Tip Entry screen to be displayed in the POI terminal.
Tip on POI Terminal
When tipping on the POI Terminal, the Sale System sends the payment request to the POI Terminal without a tip. The POI Terminal gives the option for the card holder to enter a tip amount. The payment response will contain any tip entered by the card holder.
For example:
- Cashier opens $100 sale on the Sale System and initiates payment
- Sale System sends a payment request request to the POI Terminal and sets
- PaymentTransaction.AmountsReq.RequestedAmount to $100 (sale amount + tip)
- PaymentTransaction.AmountsReq.TipAmount to $0
- POI Terminal presents UI to the card holder which allows them to enter a tip
- Card holder enters tip amount of $10
- POI Terminal processes a payment of $110 and includes tip amount on the payment receipt
- POI Terminal approves payment and returns the result to the Sale System with
- PaymentResult.AmountsResp.AuthorizedAmount set to $110
- PaymentResult.AmountsResp.TipAmount set to $10
- The Sale System records the approved payment, and optionally records the tip amount of $10
The amount returned in AuthorizedAmount in the payment result may be differ from the RequestedAmount sent in the payment request
Dynamic surcharge
Dynamic surcharging allows the merchant to recover their 'cost of acceptance' by enabling the POI Terminal to automatically add a surcharge percentage to the purchase amount based on the card type presented by the customer.
A distinct percentage can be applied to the card types:
- Visa / MasterCard credit
- Debit (EFTPOS or Visa or MasterCard)
- Amex / Diners
The dynamic surcharging settings are managed on Unify per merchant. In development, contact DataMesh to configure dynamic surcharging on your development account.
Dynamic surcharge example:
- Merchant enables dynamic surcharge on Unify for their terminal fleet and configures a 1.9% surcharge on Amex/Diners cards
- Cashier opens $100 sale on the Sale System and initiates payment
- Sale System sends a payment request request to the POI Terminal and sets PaymentTransaction.AmountsReq.RequestedAmount to $100
- Card holder presents their Amex card
- POI Terminal calcualtes new total based on the card type and processes a payment of $101.90
- POI Terminal approves payment and returns the result to the Sale System with
- A receipt containing lines with the requested amount, surcharge percentage, surcharge amount, and new total amount
- PaymentResult.AmountsResp.AuthorizedAmount set to $101.90
- PaymentResult.AmountsResp.SurchargeAmount set to $1.90
- The Sale System records the
AuthorizedAmount, and optionally records theSurchargeAmountof $1.90
The amount returned in AuthorizedAmount in the payment result may be differ from the RequestedAmount sent in the payment request
Merchant responsibilities
- Merchants are required to notify the cardholder that a surcharge will be applied. For example, by ensuring signage at the point of purchase
- The RBA surcharge framework indicates merchants should review the level of any surcharge applied at least once a year
- Any refund of a purchase with surcharge applied needs to include the full purchase + surcharge amount
Error handling
When the Sale System sends a request, it will receive a matching response. For example, if the Sale System sends a payment request, it will receive a payment response.
However, in unusual scenarios wherein the Sale System sends a request but doesn't receive a corresponding response (for example, due to network error or timeout), the Sale System must enter an error handling loop.
More information about how to handle such scenario can be found in the Error handling section of the Cloud API
Fuel API
The Fusion Fuel API is an extension to the Fusion Core API which adds support for current and future fuel payment types accepted by DataMesh. (e.g. FleetCard, Shell Card, MotorPass etc)
For more information see the Fusion API Fuel Extension
Stored Value API
The Fusion Stored Value API is an extension to the Fusion Core API which adds support for gift card payments.
For more information see the Fusion API Stored Value Extension
Product level blocking (PLB)
PLB is a program that automatically prevents enhanced income management cards from being used to purchase restricted items (alcohol, gambling services, tobacco products, cash-like products etc).
PLB transaction example:
- When constructing a Payment Request, the Sale System sets the PaymentRequest.PaymentTransaction.SaleItem[].Restricted flag to
truefor each sale item classified as "restricted" under the PLB scheme. - The cardholder presents their card on the POI Terminal.
- If the card presented is an enhanced income management card, and either the Sale System has flagged sale items as
Restricted, or no sale items were provided in the request, then the POI terminal declines the sale - PaymentResponse.AllowedProductCodes contains the
SaleItem.ProductCodeof items which were blocked - PaymentResponse.Response.Result will be set to
Failure - PaymentResponse.Response.ErrorCondition will be set to
PaymentRestriction - PaymentResponse.Response.AdditionalResponse will contain "Restricted items" if the payment was declined due to restricted items, or "No Product Data" if the payment was declined due to no
SaleItemdata provided.
Restricted payment brands
This feature is only available to select merchants. Please discussion with the integrations team before implementing.
The Sale System can restrict the payment request to specified payment brands by configuring PaymentRequest.PaymentTransaction.TransactionConditions.AllowedPaymentBrand.
This can be used by the Sale System to implement business rules for restricted payment types per transaction. e.g. preventing the purchase of a gift card with another gift card, or preventing the use of loyalty cards when discounts have been provided.
Payment request
The Sale System can configure the restricted payment brands behaviour in several ways:
- Allowing all payment brands
- Specify allowed payment brands
- Specify allowed payment brand categories
- Specify allowed payment brands
- Specify allowed payment brand categories
Where possible, the Sale System should specify payment brand categories instead of specific payment brands. This will ensure the expected behaviour continues once payment brands are added in the future.
Allowing all payment brands
The default behaviour by the POI Terminal is to accept all payment brands when AllowedPaymentBrand is null or empty.
Example - allow all payment brands
{
  "PaymentRequest": {
    "PaymentTransaction": {
      "TransactionConditions": {
        "AllowedPaymentBrand": []
      }
    }
  }
}
Specify allowed payment brands
To specify which payment brands to allow, add the supported PaymentBrandId to AllowedPaymentBrands.
When an allowed payment brand is specified, all other payment brands are blocked.
Example - block all payment brands except VISA Debit and VISA Credit
{
  "PaymentRequest": {
    "PaymentTransaction": {
      "TransactionConditions": {
        "AllowedPaymentBrand": [ "0004", "0005" ]
      }
    }
  }
}
Specify allowed payment brand categories
To specify which payment brand categories to allow, prefix Category: to a supported PaymentBrandId category in AllowedPaymentBrand.
When an allowed payment brand category is specified, all other payment brands outside the category are blocked.
Example - block all payment brands except card schemes
{
  "PaymentRequest": {
    "PaymentTransaction": {
      "TransactionConditions": {
        "AllowedPaymentBrand": [ "Category:Schemes" ]
      }
    }
  }
}
Specify restricted payment brands
To specify which payment brands to restrict, prefix a ! to the restricted PaymentBrandId in AllowedPaymentBrand.
When a restricted payment brand is specified, all other payment brands are allowed.
Example - allow all payment brands except EFTPOS & Blackhawk
{
  "PaymentRequest": {
    "PaymentTransaction": {
      "TransactionConditions": {
        "AllowedPaymentBrand": [ "!0001", "!0600" ]
      }
    }
  }
}
Specify restricted payment brand categories
To specify which payment brand categories to restrict, prefix a !Category: to the restricted PaymentBrandId category in AllowedPaymentBrand.
When a restricted payment brand category is specified, all other payment brands outside the category are blocked.
Example - allow all payment brands except gift cards and fuel cards
{
  "PaymentRequest": {
    "PaymentTransaction": {
      "TransactionConditions": {
        "AllowedPaymentBrand": [ "!Category:GiftCard", "!Category:Fuel" ]
      }
    }
  }
}
Mixing allowed and restricted payment brands and categories
The Sale System should take care when mixing allowed and restricted payment brands and categories
Specifying a restricted payment brand category as well as a restricted payment brand is supported.
*Example - allow all payment brands except fuel cards, gift cards, and Flybuys.
{
  "PaymentRequest": {
    "PaymentTransaction": {
      "TransactionConditions": {
        "AllowedPaymentBrand": [ "!Category:Fuel", "!Category:GiftCard", "!0402" ]
      }
    }
  }
}
Mixing allowed and restricted payment brands and categories is not recommended as it can lead to unexpected behaviour.
Example - block all payment brands except fuel cards. The !0001 entry will have no effect
{
  "PaymentRequest": {
    "PaymentTransaction": {
      "TransactionConditions": {
        "AllowedPaymentBrand": [ "!0001", "Category:Fuel" ]
      }
    }
  }
}
Payment response
If the cardholder presents a restricted payment brand, the POI Terminal will decline the payment request with the payment response set to:
- PaymentResponse.Response.Result will be set to
Failure - PaymentResponse.Response.ErrorCondition will be set to
PaymentRestriction - PaymentResponse.Response.AdditionalResponse will contain "Restricted payment brand"